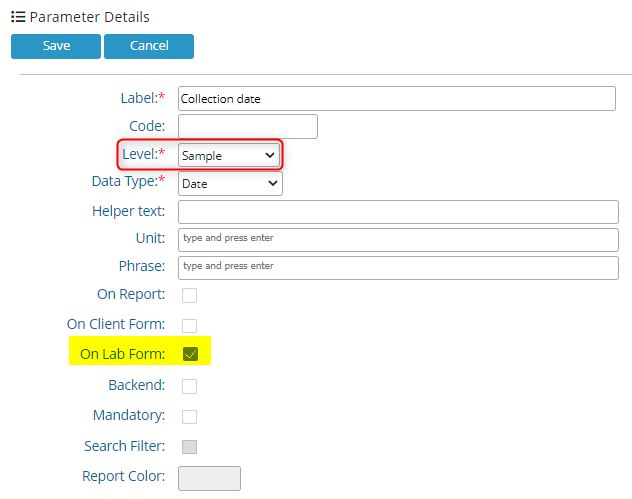
5.1.2 Sample level Parameters
You can create and add custom fields at sample level by going to LSM 🡪 Admin 🡪 Preferences 🡪 Parameters.
Create custom fields/parameters please refer to  section 6.4.2
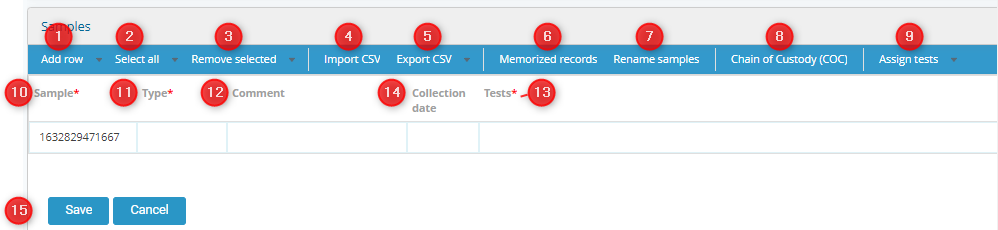
- Add row will allow you to add rows below to add sample or samples below.
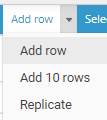
- To add a row you can either click on the "Add row in blue bar or click in the small arrow and click on "Add row" in the drop down.
- You can add 10 rows at once for adding 10 samples and the information about their tests.
- You can replicate the sample details.
*Everything except the sample number will be replicated.

- You can select or unselect rows using this option.

- You can remove the rows that are selected.
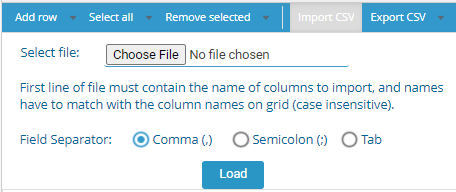
- You can import information about the CSV if you have multiple samples and you don't want to enter their information manually.
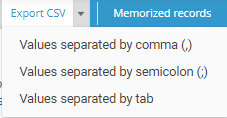
- Export CSV allows you to download all information about the samples and the related parameters/fields and information for them. You can choose the type of separator that you would like.
- With the help of memorized records you can add/import samples from the sample module in LabCollector.
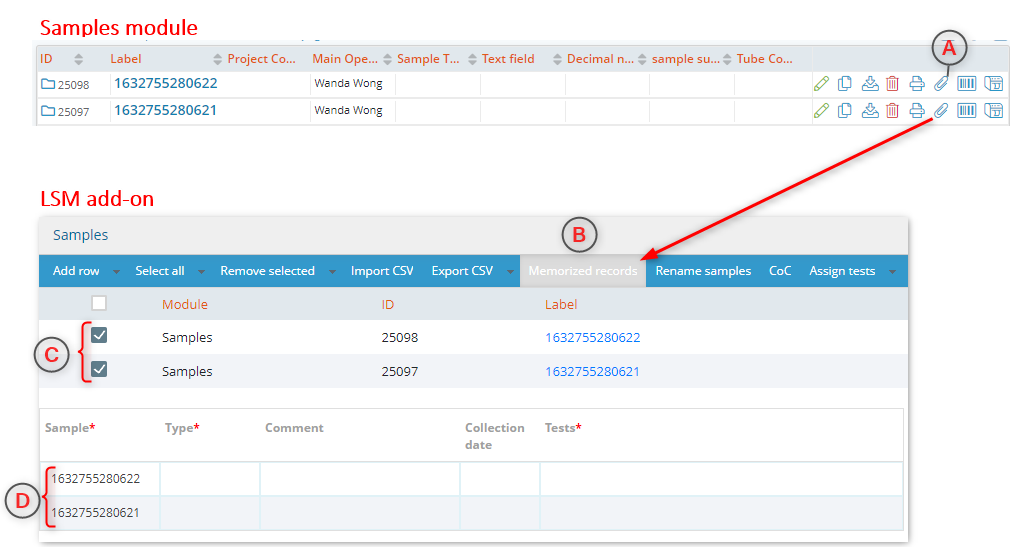
- You can rename samples by uploading sample names via a CSV. This comes in handy if you have samples to name, and you can do that by just uploading the CSV.
- Chain of Custody (CoC) is a document that help to track information about the sample.
You can set the template for the same in LSM 🡪 Admin 🡪 Preferences 🡪 Reports & Invoice templates.
Once you have created a template you need to choose it by going to LSM 🡪 Admin 🡪 Preferences 🡪 Reports & Invoice templates 🡪 Options. - Assign tests allows you to assigns tests for the job.
The setting for this can be done in LSM 🡪 Admin 🡪 Setup 🡪 Job requests.
Please refer tosection 6.7.2 - Here you can type the sample name or number. You can use this as the barcode of the sample instead of the ID.
ID is a number given to each sample by LabCOllector system itself.
Sample name, you can define if should be custom or semi automatic or completely automatic.
The settings for this can be found in LSM 🡪 Admin 🡪 Setup 🡪 Job & samples naming.
Please refer tosection 6.7.3 - Here you need to add sample type. It is a default field. Depending on the sample type chosen, the corresponding tests will show up. To associate sample types with specific tests you need to configure the test at LSM 🡪 Admin 🡪 Preferences 🡪 Test.
Settings for this can be done in LSM 🡪 Admin 🡪 Preferences 🡪 Sample type.
Please refer tosection 6.4.3 - Comment is a default field. You can add comments for the test or sample.
- Tests let you add the tests according to sample type.
- This is an example of an custom parameter. You can add custom parameter from LSM 🡪 Admin 🡪 Preferences 🡪 Parameters.
- You can save the job, once you have set the parameters according to your requirement.